macOS 26.4 Tahoe includes the new 80% charge limit feature for MacBook Air, Pro, and Neo, and here’s how you can use it.
macOS 26.4 Tahoe Brings the 80% Charge Limit Feature to Everyone – Enable it Today on MacBook Air, MacBook Pro, and MacBook Neo
Everyone found out during the beta period that macOS 26.4 Tahoe will include a new way to protect the battery health of MacBook Air, MacBook Pro, and MacBook Neo.
The feature has officially rolled out with the release of macOS 26.4 Tahoe, and anyone with a MacBook Air, MacBook Pro, or MacBook Neo can use it.
What this means is, the feature is completely native to macOS, and you do not need a third-party app in order to manage how much your MacBook battery is charged.
How it Works
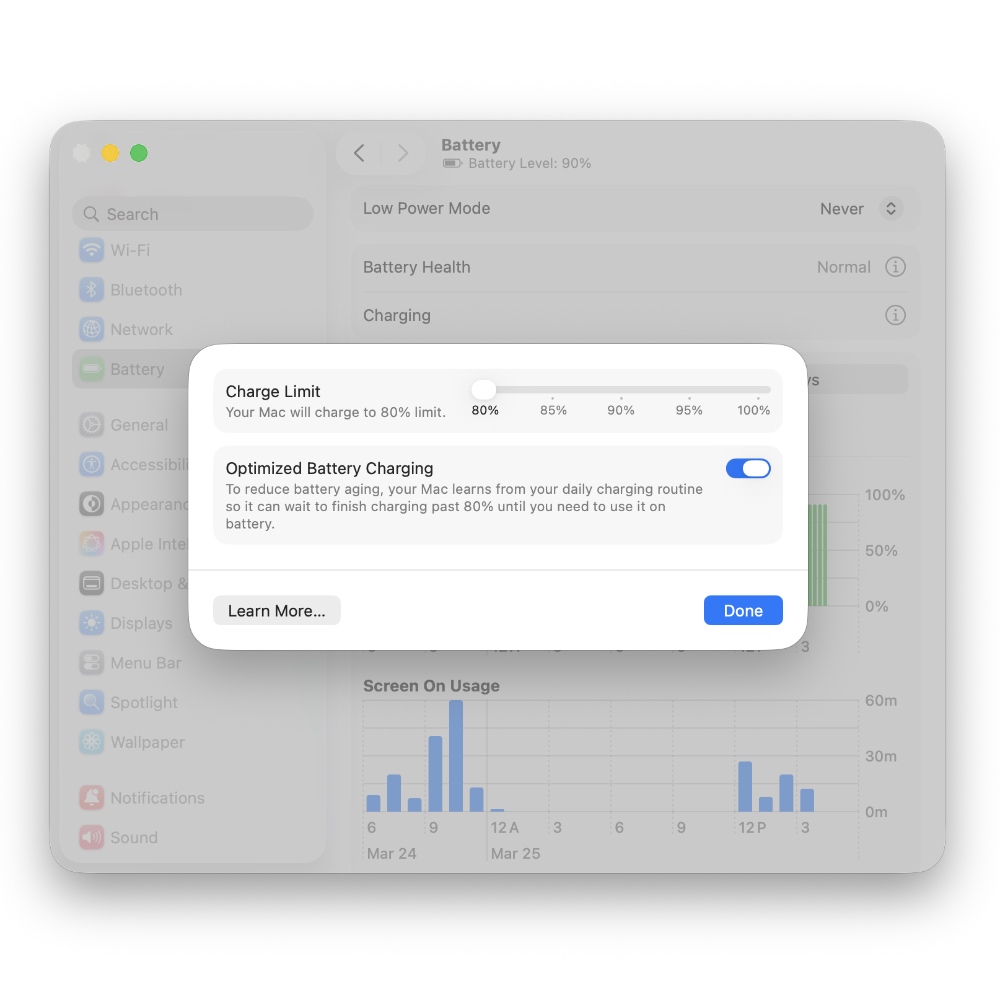
Rather than complicate things, Apple is keeping things simple with the new charge limit feature. It allows users to set a charge limit of 80%, 85%, 90%, 95%, and 100%. Once the limit has been set, your MacBook won’t charge beyond it.
However, your MacBook may charge all the way to 100% occasionally in order to calibrate the battery. But, you’ll mostly find yourself at the limit you’ve set, and macOS ensures that without your intervention.
Perfect for Desk Setups
If you use an external display with your MacBook, or keep it plugged in all the time on a desk, then this feature ensures your battery does not charge all the way to full, keeping your overall battery health intact in the long run.
Lithium batteries do not like being charged to full and kept there for extended periods of time even if they’re not being used. Therefore it is recommended that you keep your battery between 20% and 80%.
How to Set Charge Limit on Your Mac
This feature is exclusive to macOS 26.4 and above. Make sure you update your MacBook Air, MacBook Pro, and MacBook Neo to the latest update by going to System Settings > General > Software Update. Click on Update Now in order to install the update.
Once done, follow the steps below in order to set your preferred charge limit.
Step 1. Launch System Settings.
Step 2. Click on Battery in the list of options on the left.
Step 3. Find the ‘Charging’ option, and click on the (i) button next to it.
Step 4. You’ll see the Charge Limit slider at the top. Choose your preferred limit, and then click on Done.
Charge Limit is Not a Battery Health Guarantee
While the feature does slow down battery health degradation, it’s not guaranteed to work all the time. Because chemical aging is a real thing, and eventually your battery will lose its capacity to hold a charge. Whether it happens tomorrow or the day after is anyone’s guess.
Setting a charge limit, keeping your MacBook cool while it is charging, ensures that the process is slowed down over an extended period of time.