
Here’s how you can use your AirPods as a microphone for audio when you are recording a video using your iPhone from the Camera app.
Use Your AirPods’ Built-in Microphone When Recording a Video Using the Camera App on Your iPhone or iPad
The iPhone has a very high-quality built-in microphone for recording audio. Whether you’re recording a voice memo or just a regular video, you can rest assured that the internal microphone will work just fine.
However, there might come a situation where using your AirPods’ built-in microphone will be a preferred choice. Especially if you are recording a video of yourself standing far away but want to sound crystal clear. In this situation, the iPhone’s microphone won’t cut it, because it’s too far from you.
Thankfully, with iOS 26, iPadOS 26, and the latest AirPods firmware update, you can do just that. But there is a small catch – the feature only works with AirPods 4, AirPods Pro 3, and AirPods Pro 2.
Here’s how it works:
Step 1. Make sure your AirPods are connected to your iPhone or iPad.
Step 2. Launch the Camera app.
Step 3. Launch Control Center by swiping down from the top right corner of the display.
Step 4. Right at the top you’ll see an entry for Camera Controls. Tap on it to reveal more options.
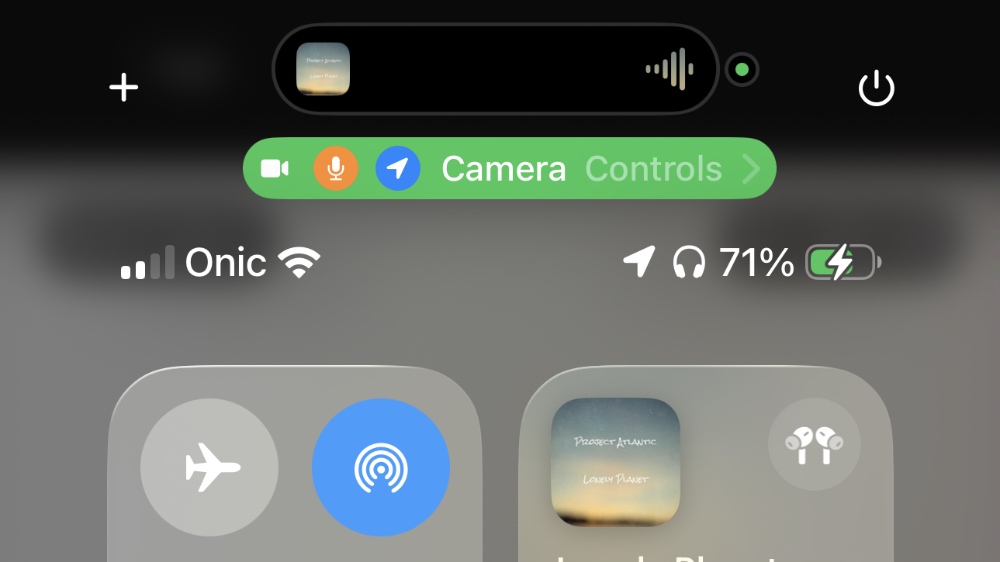
Step 5. Tap on the Input and select your connected AirPods.

Once this is done, tap the record button in the Camera app, and all the audio will be recorded using the AirPods’ microphone. Using the Camera Controls option, you’re essentially forcing your iPhone to use the microphone from the iPhone and iPad.
If you use the ‘Same as System’ option, your iPhone or iPad will choose AirPods if they are connected to your device, else they’ll fall back to the built-in microphone. But doing things manually ensures exactly which microphone should be used when recording the video – iPhone, iPad or AirPods.